Mapping buttons on VR controllers in Godot is different from the usual input mapping used for mouse/keyboard or other controllers. The key differences are the entirely separate section for button mapping called the OpenXR Action Map, and the manner of connecting these inputs to scenes and functions using signals.
A YouTube video guide is also available here.
The basic process for creating button inputs in Godot OpenXR is the following:
- Create an Action Set (or use the defaults)
- Verify that controllers have the correct names from the Action Set applied to the specific buttons.
- Emit a signal to check when a button is pressed on the controller
- Check which button is pressed and execute functions as instructed.
OpenXR Action Map
Make sure you have a working OpenXR environment setup (Godot documentation link here) and once you do, notice the new menu called OpenXR Action Map on the bottom of the Godot interface near the Output/Debugger/etc.
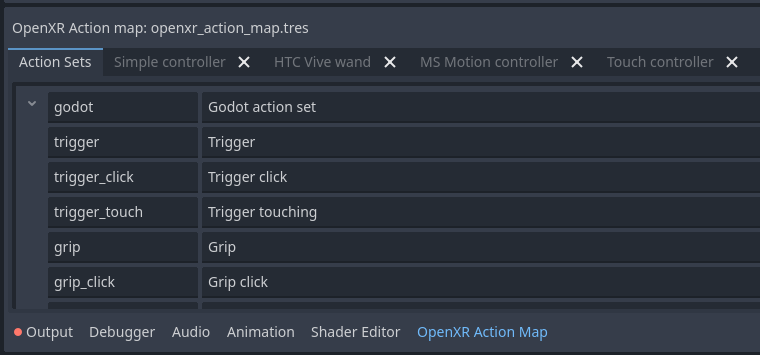
In this menu you will see Action Sets, which is how you can name certain actions you can take like pressing a button or trigger. There is also a list of controllers which is where you will map the action name to a certain button. Make note that the Action Sets simply gives names to the actions and the Controller tabs map that action name to a specific button on the controller, neither are directly connected to a scene or function yet. This tutorial simply uses the default names and controller configurations, so this mapping should already be set up. You can start making your own names and manually mapping them to controllers at a later point or as needed.
Signals
Once the actions are mapped, now you will need to create signals for them so that they can actually be used and accessed from other scenes or functions.
Make sure you select the controller node (right or left) that you want to program, and navigate to its Signal tab. You should see a button_pressed signal which you can double click to activate.
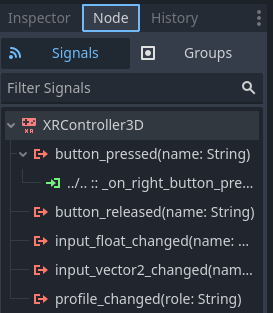
Connect this signal to any scene you want to access this button, it does not have to be attached to the OpenXR server or controller node. You should now see the signal function in whatever script you connected it to:

Checking for Input
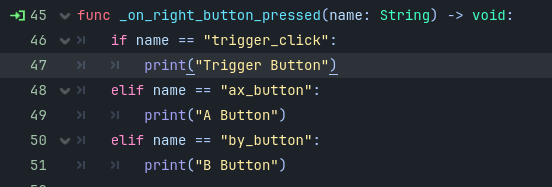
Now that you have a signal created, you need to check which button is being pressed and apply whatever functions it should execute. This function takes a name String as an input, which is how you will check to see what button is pressed.
To do that you will use an if statement in the body of the function to see if the name input matches the name defined in the Action Set.

Make note that the name must match the string in the first column of the Action Set.

As we see again, this button_pressed function now checks to see if the trigger_click on the right controller is being pressed, and if so it prints an output.

These signals can be called in other scripts, or have multiple checks like below:
Conclusion
There are other ways to map buttons for OpenXR, as well as many more options and customizations, but this is a very simple and easy way to get buttons working in Godot OpenXR. Be sure to read the Godot OpenXR documentation for additional information.
